I'm sure I probably just don't know what to put into google, but I found it hard to find a useful tutorial for making this type of rose online. So with the last one I made, I took photos as i went to show how I did it. These could easily be attached to safety pins instead, or a
crocodile clip for your hair, sewn onto bags, whatever you want really. I used satin ribbon that was about 3.5cm (1 1/4 ins) wide, and I bought 3m of each colour I was using. I didn't use all the roses I had made in the headband, but I wanted to be able to pick the best of the bunch, so I used up all the ribbon.
Apart from the ribbon ( the amount you need depends on the size of rose you want, I would say between 1m to 1.5m per flower for a decent head, but you might find slightly different) you will need a needle and appropriately coloured thread, and some fabric scissors.
Start by taking one end of your ribbon, folding it in on itself to hide the raw edges, and stitching it together with a long length of thread. Don't cut off the thread after, I keep it attached the whole way through and keep using it to secure more folds. just tuck your needle out of the way somewhere relatively safe (I use my jeans!)and
don't let the thread get rolled into the flower.

Start rolling the closed end in, keeping the ribbon quite tight on itself. As in the photo below, don't worry about the pleat starting to come out, this is meant to happen. When the roll is this small you can put a stitch right the way through the bottom of the rose, so do this whenever you feel it needs holding in place, Just make sure you go through all the layers. (I like to check it from the top before putting a stitch in, so that I can change the look of the flower if I'm not happy, without having to unpick stitches)

As the pleat comes out the top, tuck the ribbon in again at the bottom, always making the folds go in the same direction. Keep rolling the rose, still fairly tight at this point, and putting stitches in whenever you feel you need them.

Your rose will be fairly tight at this point but just keep rolling and folding the ribbon...

and sewing through the bottom for as long as you can.

Once you have a reasonable sized centre to your rose, and are about halfway through your ribbon, you need to start making larger more obvious pleats in the ribbon to create the outer petals. Fold the ribbon, still in the same direction, as in the picture below, on a largish diagonal. These first pleats will get pulled in by subsequent ones wrapping around them, so don't worry too much if they are much bigger than anything before.

I found that these pleats needed securing straight away. No need to go right through the bottom now, its
probably too thick to do that anyway, just secure the newest pleat with a couple of stitches as below, and then move on to make another one further round.

Keep looking at your rose from the top too, these pleats have a habit of falling directly outside one another, forming a sort of triangular flower, so pay attention to where you are placing each pleat, and try to move it round if you can. The bottom of the flower should be fairly tight still, it should only be opening out at the top to create the flower.

Once you are on the last pleat before the end of the ribbon, pleat it as normal, and then fold it over again at the back to hide the raw edges as much as possible, then stitch across it to secure it firmly. I trim any loose raw edges off after, and then put some extra stitches through it to make sure the end is held well down.
 Et
Et voila! your own ribbon rose :)

To make the two colour rose:
I added a shorter length of a different ribbon into the roll after starting the flower of and completing a couple of rolls. Then continue as normal.

To make the headband:
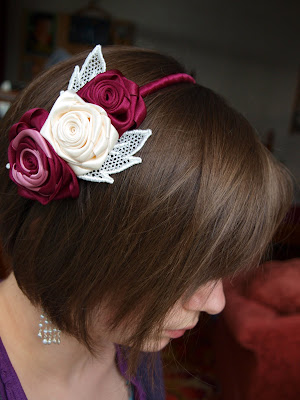
I pinned the 3 roses I chose together until I was happy with the arrangement, and then stitched them together. I then did the same with some lace leaves, and put some tiny pink pearls in as filler to hide the stitching between the leaves and the flowers, although you can't see them here. the headband was a cheap one from new look (£2) that I thought was the right colour, but turned out to be too bright, so I bought a thinner version of the same colour ribbon as the flower, and wrapped the headband with that ( I bought 2m, but probably used less than 1.5m). Then I worked out where I wanted the roses to sit on the headband, and used a curved needle filched from ma-in-law to sew through and around the headband to secure it.
If you got to the end, thanks for indulging me, and I hope it helps someone!


 I'm pretty chuffed with it. It has been hard work, it took a couple of goes until I felt the roses looked good enough, and working on things that small tends to give my fingers cramp, but I'm glad I persevered. and you know how much that has cost? about £8.


