Pages

Sunday, 30 May 2010

HOW TO: ribbon roses

I'm sure I probably just don't know what to put into google, but I found it hard to find a useful tutorial for making this type of rose online. So with the last one I made, I took photos as i went to show how I did it. These could easily be attached to safety pins instead, or a crocodile clip for your hair, sewn onto bags, whatever you want really. I used satin ribbon that was about 3.5cm (1 1/4 ins) wide, and I bought 3m of each colour I was using. I didn't use all the roses I had made in the headband, but I wanted to be able to pick the best of the bunch, so I used up all the ribbon.

Apart from the ribbon ( the amount you need depends on the size of rose you want, I would say between 1m to 1.5m per flower for a decent head, but you might find slightly different) you will need a needle and appropriately coloured thread, and some fabric scissors.

Start by taking one end of your ribbon, folding it in on itself to hide the raw edges, and stitching it together with a long length of thread. Don't cut off the thread after, I keep it attached the whole way through and keep using it to secure more folds. just tuck your needle out of the way somewhere relatively safe (I use my jeans!)and don't let the thread get rolled into the flower.

Start rolling the closed end in, keeping the ribbon quite tight on itself. As in the photo below, don't worry about the pleat starting to come out, this is meant to happen. When the roll is this small you can put a stitch right the way through the bottom of the rose, so do this whenever you feel it needs holding in place, Just make sure you go through all the layers. (I like to check it from the top before putting a stitch in, so that I can change the look of the flower if I'm not happy, without having to unpick stitches)


As the pleat comes out the top, tuck the ribbon in again at the bottom, always making the folds go in the same direction. Keep rolling the rose, still fairly tight at this point, and putting stitches in whenever you feel you need them.


Your rose will be fairly tight at this point but just keep rolling and folding the ribbon...

and sewing through the bottom for as long as you can.

Once you have a reasonable sized centre to your rose, and are about halfway through your ribbon, you need to start making larger more obvious pleats in the ribbon to create the outer petals. Fold the ribbon, still in the same direction, as in the picture below, on a largish diagonal. These first pleats will get pulled in by subsequent ones wrapping around them, so don't worry too much if they are much bigger than anything before.


I found that these pleats needed securing straight away. No need to go right through the bottom now, its probably too thick to do that anyway, just secure the newest pleat with a couple of stitches as below, and then move on to make another one further round.


Keep looking at your rose from the top too, these pleats have a habit of falling directly outside one another, forming a sort of triangular flower, so pay attention to where you are placing each pleat, and try to move it round if you can. The bottom of the flower should be fairly tight still, it should only be opening out at the top to create the flower.


Once you are on the last pleat before the end of the ribbon, pleat it as normal, and then fold it over again at the back to hide the raw edges as much as possible, then stitch across it to secure it firmly. I trim any loose raw edges off after, and then put some extra stitches through it to make sure the end is held well down.

Et voila! your own ribbon rose :)


To make the two colour rose:

I added a shorter length of a different ribbon into the roll after starting the flower of and completing a couple of rolls. Then continue as normal.


To make the headband:

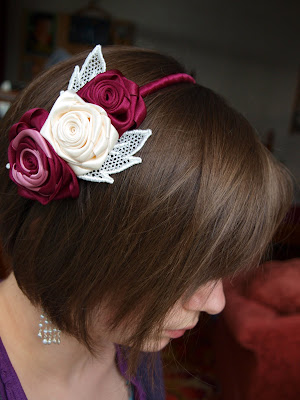
I pinned the 3 roses I chose together until I was happy with the arrangement, and then stitched them together. I then did the same with some lace leaves, and put some tiny pink pearls in as filler to hide the stitching between the leaves and the flowers, although you can't see them here. the headband was a cheap one from new look (£2) that I thought was the right colour, but turned out to be too bright, so I bought a thinner version of the same colour ribbon as the flower, and wrapped the headband with that ( I bought 2m, but probably used less than 1.5m). Then I worked out where I wanted the roses to sit on the headband, and used a curved needle filched from ma-in-law to sew through and around the headband to secure it.

If you got to the end, thanks for indulging me, and I hope it helps someone!

DIY #3: ribbon rose headband

This has been an on-off project of mine for a couple of months now. turning this:


Into these:

To make this:

I'm pretty chuffed with it. It has been hard work, it took a couple of goes until I felt the roses looked good enough, and working on things that small tends to give my fingers cramp, but I'm glad I persevered. and you know how much that has cost? about £8.

The only thing I would say is that it is slightly one side heavy, so I feel like its going to droop off my head, but I don't think it actually will! I'm reserving to go out and buy something different until I've had my hair trial, I want to see what its like in my hair once it has some volume to it.

I'm going to make my next post a 'how to' on these roses, I hope you don't mind, I'm kind of gagging to write a how to, and I found it hard to find a good tutorial on these things online, I had to adapt the best one I found to get these, so I thought I'd show you what I did.

Wednesday, 26 May 2010

Changes

Since I've started getting told off by a certain lady for not posting for ages, I thought I should get you up to speed with the last week.

Last monday, I got an email from our photographer, unfortunately pulling out of our wedding for various reasons. cue a little bit of foot stomping, there may have been a couple of tears, James may have had to make me dinner.

I then spent the next 3 day emailing various recommendations, looking constantly at wedding galleries until every wedding merged into one, and reading and being very thankful for positive, helpful, and generally nice emails from the same aforementioned lady, who quite frankly, I'm not sure I could have got through the week without. On Friday, just when I was getting worried that all wedding photographers would be away for the weekend, and I was really sick of spending more time on google, I got an answerphone message at work from this lady, who was actually free on our date! heaven forbid, a photographer, who takes lovely photos, free 5 months before the date? seemingly unheard of. Anyway, she is a delight. in the last 4 days she must have a had nearly 15 emails from Mum and I, and shes been nothing but wonderful about it all.

So that was the week that was last week, I'm glad its over! normal programming will resume shortly, probably with the headband I'm making, the invitations I'm not making, and the wedding shoes that have been sitting here for a month not being shown to the world. Oh, and we meet the vicar for the first of our wedding preparations tomorrow night. eeep!

Sunday, 16 May 2010

the joys of (mostly) internet shopping.

I've had this ready to post for a while, but preparing for an imminent visit from best friends and goddaughters, and then having a visit (ongoing) from said goddaughter and friends has taken up most of the last week. She is so much fun at the moment, just walking, and starting to talk. yesterday she said hello to grandma on the phone, and eeyore at a donkey. Last night lovely bridesmaid came round, and two of my worlds collided when two bridesmaids met for the first time. my 'sister' (visiting best friend) and best friend (lovely bridesmaid) hugging and chatting in front of me made my day. And we're all the same height! definitely going to have to make that satin covered box the other bridesmaid was asking for...

Anyway, back to the regularly scheduled programming. I went a bit mad with my paycheck at the beginning of this month, I had written a list of all the things I had been eyeing up for a while and wrote out the prices, so that I could decide what to buy first. Instead I pretty much bought them all. they were all just detail items though, so it wasn't too bad. Anyway, here they are:


from sort of left to right, with links where possible:

  • fabric glue, for fixing bridesmaids clutch bags into the metal frames
  • lace letterpress cards from Papermash - these are gorgeous, delicate little cards, 6 in a pack, which I'm going to use for notes to the bridesmaids, and parents I think/
  • a large plum ink pad.
  • a luggage label cutter from woodware for the favour labels.
  • rubber stamps numbers set from cutetape (using a discount from a post on Oh, hello friend)
  • a massive reel of ribbon from the market, originally 100m, but sold by the metre so some had gone, they guessed 80m was left, which made it £11 and then they gave me 10% off on top. I'm going to use it for the invitations and orders of service etc etc
  • a black ink pad
  • a book of sheet music from a charity shop, which I might use to make confetti cones if I'm allowed confetti.
  • a broken ring box, from ebay, which I thought our rings could go in, but might not work.
  • adobe photoshop elements, as you can see, not only for the invitations, but also for my own work.
  • a bag of chain, for the clutch bags, from u-handbag
  • a doily rubber stamp, for use on all the stationery
  • a metal frame for the purses, also from u-handbag

It was a busy month for my wallet! what with also buying the pashminas etc, and just living in general. I've also since bought some lace and pink pearls for my headband, but that's for another post methinks.phew!

Saturday, 8 May 2010

I heart this heart.

I had another meeting with the florist this week, which has left me thinking about the church flowers (we found out that our church does not do flowers on the weekends of weddings, as they have been let down before) and specifically what flowers to put in the porch. I think this picture maybe problem solved! isn't it beautiful?
My florist actually seems to be trying to save us money, she keeps downsizing my plans! I had gone to her with the thought of a small arrangement on the little table sitting in the porch, and she suggested another vase of gyp instead to tie in with my theme inside the church itself, but we are also considering an informal welcome line in the porch after the service, and I was worried about the space in there, so hanging a wreath instead may sort that out for us too!

political baking.

I made these for an election 'party' a couple of friends and I had on Thursday night. we had coloured food, drink, balloons, and dress. we played mario kart on the Wii, and it said 'victory to the red team', which we thought might be a prediction, but now I'm not so sure. believe me when I say that this was the best looking food by far that evening, and I'm not just blowing my own trumpet.
I used the hummingbird bakery vanilla cupcake and frosting recipes, I can't believe how much better they were than anything I've ever baked before, just because of a different recipe. I was only given the book for my birthday, (I'm a little late to the hummingbird bandwagon) and I;d made the brownies the night before. flippin heck they are GOOD.

Friday, 7 May 2010

over exertion.


Its a hard life being Louis...

Saturday, 1 May 2010

tick, tick, tick.

I don't mean to brag, but yesterday was mega ticks in boxes day. It felt gooooooood.
1: before I was even out of pj's, I bought metal purse frames from u-handbag to try and make the 4 of us bags. I've done a trial run with a smaller frame following the really helpful tutorials that they have on their blog, so I now understand the theory of it all, so hopefully I can make bags for us. eeek. I've bought a remnant of white dupion silk from work, and I got some pink satin backed dupion for the inside lining, and I'm going to try and put a big bow on the front.

2: I went into town and bought:
  • ribbon to try and make headband with
  • a paper punch that cuts gift tags
  • 3 pashminas from accessorize
  • 3 hairclips from accessorize
  • a pair of lace fingerless gloves for one of the girls who I think will like them (from accessorize!)

3: I went to the jewellers and took them the design we had seen for my ring in Glasgow. I feel better about showing you it now, as its started (!!!). Its based round this ring:

rox

Imagine, if you will, that on one side, two of the pieces part more significantly, to make a bigger notch for my ring to fit in. When I have drawn it (or had it drawn for me by a lady in glasgow who then let me TRY THE PAPER ON - had to get it in somewhere R) its been more asymmetrical than it is here, which I like. Anyway, the upshot is that the jeweller man liked it, said it was perfectly doable, and then took my engagement ring off me :( so that he can work on fitting my wedding ring around it. I get my engagement ring back next Friday, and I think there might be something to try on as well. Big tick :) I'm now having to wear another ring so that i don't feel like I've lost my real ring!

phew. what with also going to a paper mill, morrisons, picking up a friend from college, and sitting down, it was quite a busy day!